Community management
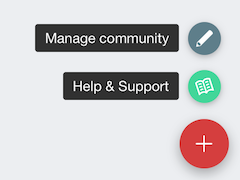
All the community set-up and admin functions are in your Community Management area which you access via your homepage. You'll see the community name at the top left corner of the page and in the bottom right hand side of the page you'll see a Plus button. When you hover over this Plus button you will see a list of options, choose Manage community.
Please note: only those people that you have given admin access to for your community will see this option.
If you don't see the 'Manage Community' option check that this is your community and not another community that you are a member of (such as Community Owners).
To get back to your homepage at any stage simply click on the clouds next to your community name in the top left corner.
Under the Help & Support option is a section for your clients to contact you for help. Any messages here go directly to you via your support email address and not to us, so don't use this to ask us for help as we won't receive it! Use the purple chat button in the bottom right hand corner of this guide.
Giving someone Admin Access to your community
If you wish to give someone else access to your community management area so that they can help with the set up and administration, follow the steps below:
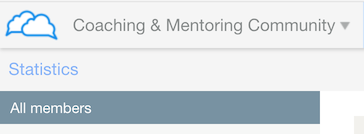
- In the Community management area, hover on the Users tab and select Programmes.
- Click on All members and you will see a list of the members in your community.
- Tick the box to the left hand side of the person you want to give Admin access to.
- You will see buttons displayed as shown in the screenshot, click on the More button.
- In the drop-down list you will see the option 'Set as Admin'. Select this and you will see ADMIN in green letters next to the person's name.
If you want to remove Admin access, follow the same steps and select 'Set as non-admin'
